Image resolution and megapixels are some of the most misunderstood terms used in digital imaging, among both enthusiasts and professionals alike. And yes, I just said professionals.
To get the ball rolling on this topic, I’m gonna just come right out and say something that might get the odd raised eyebrow, but nevertheless true: “DPI (resolution) is practically irrelevant until you want to print your image”.
Surprised?! Well, some of you at least. What is important is the total number of pixels in the image. The resolution itself can be set to whatever you want (72, 150, 300 or 1000 dpi) and as long as the total pixel count in the file remains the same, the quality is maintained too.
So what is DPI after all?
DPI stands for Dots Per Inch, and since computer monitors don´t display in dots — but rather in pixels — this can only refer to the dots made by printers when reproducing a digital image… because that’s what they do… dots… millions of them! An important point to remember is that the DPI of a file is just a way to measure it. Maybe you’ve heard someone say that they need a file at 300 dpi… well, ANY image file can be measured at 300 dpi, whether it has been saved that way or not!
Here’s how it works:
Let’s say you have a 2848×4288 pixel image at 72 dpi.
At this resolution you could produce a 39.5 x 59.5 inch (100.3cm x 151 cm) printed image. So, if you divide the numbers of pixels by 72 dpi you will get the total number of inches that the image can be printed at:
2848 / 72 = 39.5 inch (100.3 cm)
4288 / 72 = 59.5 inch (151 cm)
Print size: 39.5 x 59.5 (100.3 x 151 cm)
To illustrate this, let’s take a look at the Image Size dialogue box in Photoshop CS6:
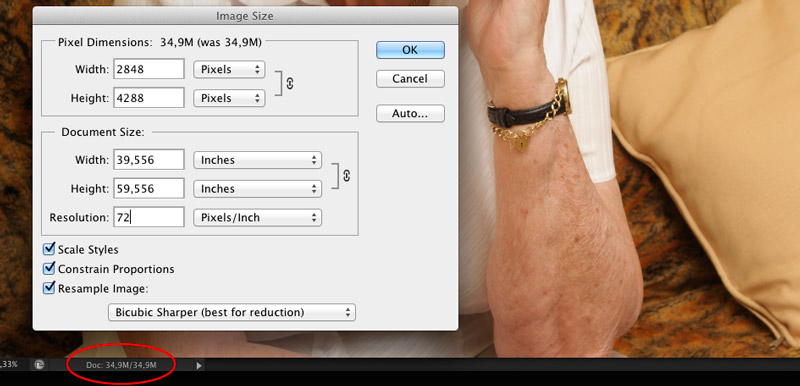
Several things are worth noting in this screenshot:
1 – at the bottom of the document window you can see the file size is 34.9 Mb (MegaBytes)
2 – the Pixel Dimensions in the upper section of the Image Size dialogue box: 2848×4288
3 – in the Document Size section, note the big physical dimensions if we wanted to print at this resolution of 72 dpi.
Now let’s change the resolution of the image without touching the number of pixels, therefor preserving it’s quality. Here’s how:
Step 1: In Photoshop (or Photoshop Elements) choose Image > Image Size
Step 2: At the bottom of the Image Size dialogue box, uncheck Resample Image (important). By doing this, the pixel dimensions are locked, therefor locking the quality. Now enter 300 into the resolution box and watch what happens.

What has changed? Now the image is 300 dpi and consequently the physical dimensions have decreased to 9.5 x 14.3 inch (24 x 36.3 cm). In other words, the pysical dimensions of the image have changed but not the pixel count. See how the size of the image didn´t change at all? Still those good ‘al 34.9 MB. We haven´t altered the pixels (quality), only the measurement (dpi) which affects the physical output of the image.
IMPORTANT: As long as you uncheck the Resample Image box you can change the resolution as many times as you like, and you won´t be affecting image quality at all.
Ok, sounds great but, what resolution do I need?
Well, that depends. Assuming you want to have your image printed, first you must determine what kind of printer it will be reproduced on and at what size. If a commercial printer (offset) is your image’s final destination then 300 dpi is usually required, unless it’s for a newspaper for which anywhere between 150 and 200 dpi will suffice. High end giclée inkjet printers can achieve very good results from 150 dpi files, although even with 100 dpi files the outcome is above average most of the time. For best results a 200 dpi file is required though.
So, going back to our initial 2848×4288 pixel image example I could print the following on a high end giclée printer:
– 28.4 x 42.8 inch (72.3 x 109 cm) — For an above average quality print at 100 dpi:
– 19 x 28.5 inch (48.2 x 72.6 cm) — For a very good quality print at 150 dpi
– 14.2 x 21.4 inch (36 x 55 cm) — For an Excellent quality print at 200 dpi
To find out at what sizes you can print your images at different resolutions depending on the requirement of the output device, just remember the formula… ok, for those who’ve forgot, just divide:
Width in pixels by desired output resolution = print width
Height in pixels by desired output resolution = print height
Your megapixel will be width in pixels x height in pixels, for example:
3000×2000 = 600 000 = 6 megapixels
Well, that’s a wrap on resolution and I hope this small article has explained resolution well enough to save you the cold sweats whenever you need to print your images.
If you have any questions, opinions and/or experiences you’d like to share please leave them down below.
Thanks!
Stay tuned!

10 comments: On Do MegaPixels matter?
Hey Nick, great post! These things go through my mind often, as much of my art is digital. It really sucks when you want to go smaller, but don’t have the tech. I recommend your site to anyone who wishes to better define their images. I’ll be back.I really don’t understand much about this, but it’s ok. You are the guru here!
Hi Sam,
Glad you liked it. It is indeed a subject that baffles many people but crucial to understand for anyone using digital imagery. Funny enough, I come across quite a few folks who “think” they have the resolution concept nailed but in reality only possess a faint idea of it’s inner workings.
Going smaller isn’t much of a problem, it’s going bigger that presents more of a challenge.
Great post!
I don’t know anything about photography or photoshop or anything of that nature so this was a very interesting read. I have tried to mess with images when I was printing them and I always messed with the pixels and not the DPI so it’s good to know that the pixels don’t have anything to do with it.
The post was very informative and the way you explained everything was very clear.
Thanks for the post!
Hey Derek
Thanks a lot!
Well, pixels do in fact matter when you want to print your image. I think that where most people get in to trouble is when they keep the Resample Image option checked when adjusting the document size. This alters pixel dimensions and consequently the image “quality”.
DPI should be set to whatever your output device requires.
Nick, thanks for this.
I’ll admit I’m one of the enthusiasts you mentioned. For all the time I’ve been using images in video work and documentation, I’ll admit not knowing (or more accurately, registering but not paying much attention to) the difference between pixels/inch and dpi.
When I’m exporting files out of my photo editor (I use Gimp – because it’s free) I’m tempted to mess with the pixel dimensions – to reduce the file size. It always does, however, try to save the image as another copy. It generally won’t save it over top of the existing, native file – thank the muses for that on several occasions.
Do you always work with the RAW files in Photoshop – and then convert to jpeg or whatever?
Larry,
I usually won´t save over my RAW files in Photoshop, but I will nevertheless ALWAYS work in a lossless file format like a .PSD or a .TFF.
My workflow starts in Lightroom, this is where I do some basic adjustments (will do more or less depending on the project) and then I will open the file in Photoshop and save either in PSD or TIFF file format. This is what I call my editing file and where I expand on and fine-tune editing. When I’m done the final file will be either a flat .TIFF file or a .JPG depending on destination and/or client requirement. If delivered files need further adjusting after client assessment, I’ll go back to my “editing file”.
I didn’t understand why when you increase the dpi the image decrease …
Hi Paul,
Providing you have “Resample Image” deselected the pixel dimensions will remain intact.
I’ll try and explain by using small square boxes and sand as an example. 10 boxes are lined up horizontally and 20 boxes vertically and you have a small bucket of sand. If you fill each box only half way you will be able add sand to all the boxes (10 boxes x 20 boxes, we’ll call this the equivalent to 150 dpi). But, if you start by filling the boxes to the brim (equivalent to 300 dpi, for example) you will only be able to fill 5 boxes horizontally and 10 boxes vertically. This is why the more pixels you put into each inch, the smaller the document size will be and vice versa.
Hope this helps!
Hi Nick,
I’m a photographer who uses both DSLRs and smartphones so this article was particularly interesting for me.
I don’t have a printer to print out my images as of yet, but I think this is a good guide on what settings to use to get the best printed images possible. I will definitely bookmark this for future reference.
Hi Ian,
I’m glad the article was helpful to you! If you have any questions going forward I’d be happy to answer them!
Thanks