Without going into detail about why chromatic aberration occurs in our digital images (maybe in a future post) the dreaded “purple fringe” is a widespread problem, so I decided to write up a quick n’ dirty tutorial on how to eliminate it in Photoshop. This phenomena doesn’t happen with every picture you take or with every camera + lens combination but I think it’ll be pretty easy for you to find at least a handful of images in your collection that suffer from this malady.
Now, as many of you may know, there’s more than one way to skin a cat in Photoshop, but this is, by far, my favorite and most effective way to skin this pussy (as in the aforementioned feline, of course). I’ve used it dozens of times and it has never let me down. I love this technique because it gives me pinpoint precision and control, allowing me to eliminate it in the blink of an eye (in slow motion).
Please note that this is not an entry level technique (although beginners can benefit from it too), being more oriented to the intermediate-advanced user/photographer, mostly because they have the knowledge to identify it as being a problem in the first place.
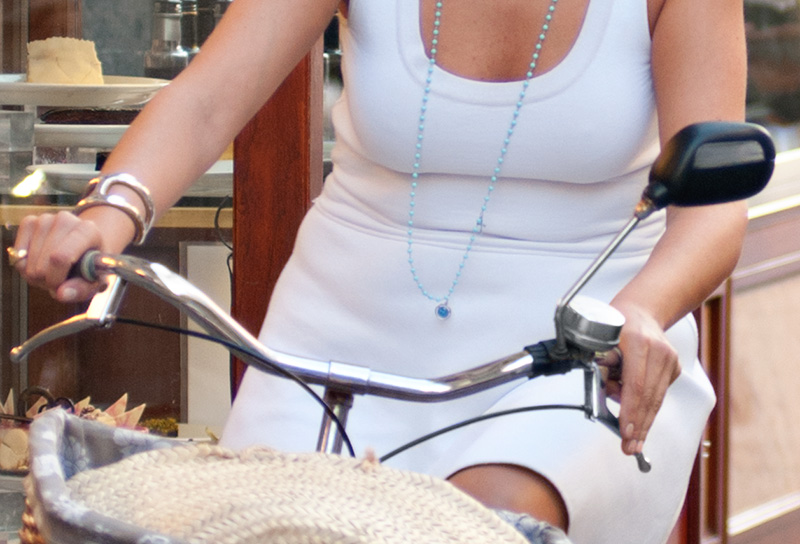
To start off, lets take a look at what purple fringing looks like in the image (cropped) below:
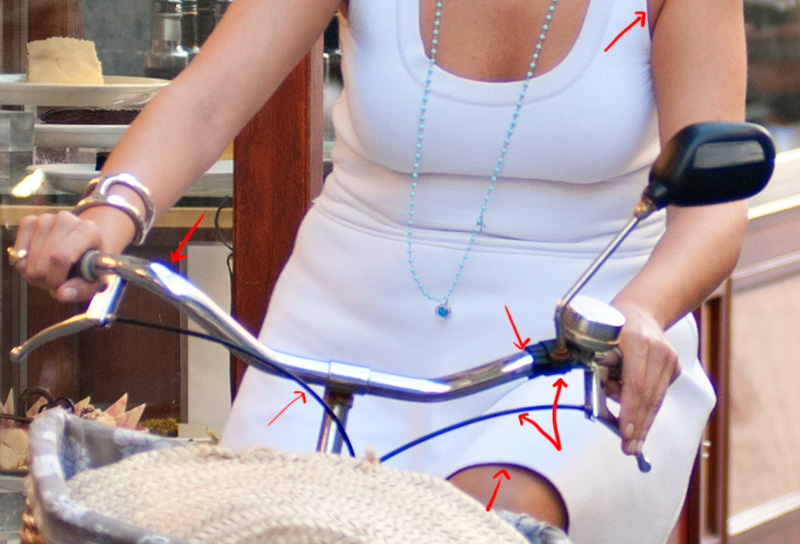
This isn’t one of my sharpest images so please overlook this technical faux pas. Anyway, the purple fringe is visible running across the handle bars, break cables and lever and her bracelet, as indicated by the red arrows.
Let’s get our hands dirty!
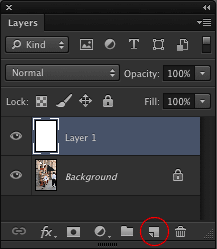
Step 1:
Open your image in Photoshop and in the Layers palette create a new empty layer, on top of your image layer.
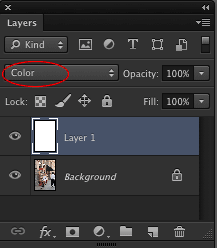
Step 2:
Change the blending mode of the new layer to “Color”.
Step 3:
Select the brush tool and use a soft edge to start with (hardness at “0” or close to it). As you progress through the process you might feel the need to vary brush hardness and/or Opacity settings. The brush size depends on the area you are working on, but I usually go with a size that overlaps both the “good” and “problem” area slightly. Don´t forget to zoom in!
Step 4:
Use the Eyedropper tool to select some color on the outside of the fringe (Option + click on a Mac or Alt + click on a PC).
Step 5:
Paint over the fringe
Here is the result:
Most of the time purple fringing pops up in small areas, hence my preference for this technique which, by the way, requires some brush stroke proficiency, one of the reasons why I recommend a graphics tablet.
When this digital ailment takes on mammoth proportions though, more “overall” techniques might be in order.
Sometimes you might find that this particular CA (Chromatic Aberration) problem isn’t so purple after all, but is rather green or some other lovely color. No worries… this technique isn’t fussy when it comes to the hue of your fringe!
If you have any questions about this technique or if you feel like sharing one of your own, please drop them down in the comments!
Thanks

4 comments: On How to eliminate the Purple Fringe in Photoshop
Very interesting technique, I’ve tried a simpler way to deal with CA (via a hue/saturation adjustment layer), but this results in an annoying halo effect around the edges… 😛
Great article, looks simple and effective, definitely going to give this technique a shot!
Thanks!
Hey Carlos,
You’re absolutely right, a Hue/Saturation adjustment layer at first glance seems to be super quick and effective but leaves an unsightly halo around affected areas. It’s ok for a quick and dirty fix but for those doing serious retouching/editing, a different approach is needed.
Nick,
I just tried this technique out and although it works flawlessly I find that contouring the affected edges can be quite time consuming.
Are there any other ways of removing purple fringe without having to brush stroke the affected areas?
Hi Luisa,
Yes there are other ways to solve the purple fringe problem but I have found them to be unsatisfactory. Like another reader (Carlos) mentioned above you can use a Hue/Sat Adjustment layer and desaturate the BLUE channel (or other depending on the color of the fringe) then mask if needed. The problem with this approach is that it usually leaves an unsightly glow (halo) effect around the edges of the affected areas.
I’m assuming you are using a mouse for your work, right!? Have you ever tried a graphics tablet? By using one you can easily cut your execution time in half.
You might want to check out my article on graphics tablets: Do I need a graphics tablet for photo editing?