The Levels adjustment is a powerful yet often overlooked tool available in Photoshop that has the capability of improving your digital images in seconds.
As some of you may know, I edit images every single business day (either for my printing business or my personal images) and the first thing I do after converting to Adobe RGB is create a Levels adjustment layer to check the histogram. 7 times out of 10, especially with client files, the tonal range is dwarfishly short, resulting in dull images. In this post I’ll show you how to instantly improve your digital images with a Levels Adjustment layer*, but first let’s take a look at what the Levels tool is.
*for size and clarity reasons screenshots are Levels Image Adjustments not Adjustment layers
What is Levels and how it works
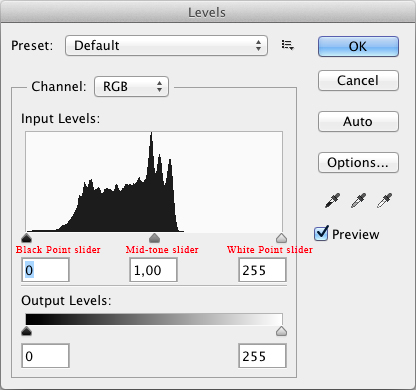
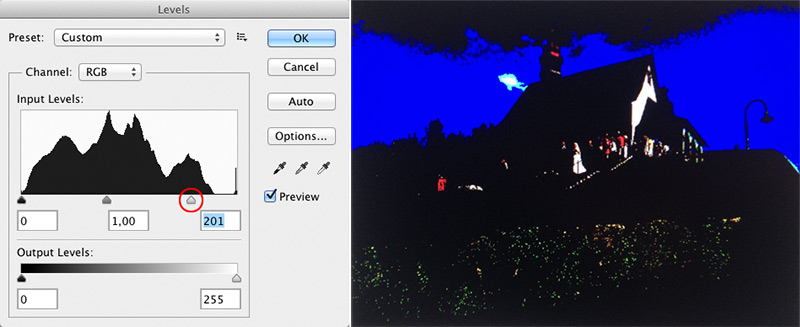
The Levels Adjustment tool allows us to alter the brightness level in an image. This can be achieved by moving the sliders available within this tool: Black point (0), white point (255) and mid-tone (128) sliders. By moving these we are repositioning the input levels. In the image below you can see the sliders identified in red.
Adjusting the sliders to improve your images instantly
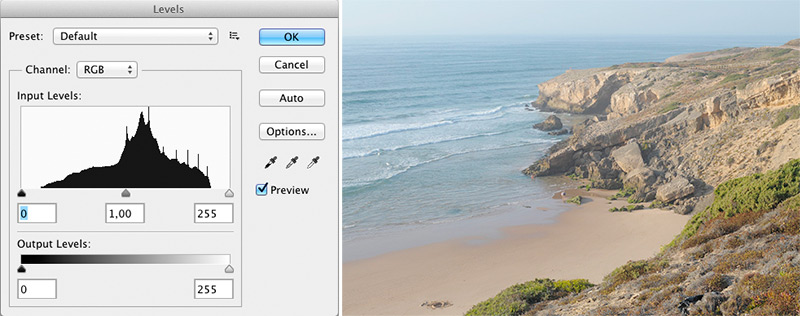
After using Photoshop for almost 20 years and having edited thousands of images, I strongly believe that most photographs look best when their tonal range extends from 0 to 255. What that means is that the image includes information in the highlights all the way over to the shadows and everywhere in between. If your images look like the life has been sucked out of them, you can be pretty damn sure that your histogram is crippled. Don’t worry, there is an easy fix for this and I’ll show you how to go about it. Looking at the image below you can see it looks a bit dull. By checking it’s corresponding histogram in the Levels Adjustment, the reason why is evident… lack of information in the shadows and highlights.
Improving your images with this editing trick should take you no longer than, say… 20 seconds and is done in two steps (ok, three if you count opening your image as a step) and all it boils down to is moving the black and white sliders in to where the histogram starts.
Ok, let’s do this.
Step one: Open your image
Step two: At the bottom of the Layers palette click the Adjustment Layer button (round button half white half black) and choose Levels
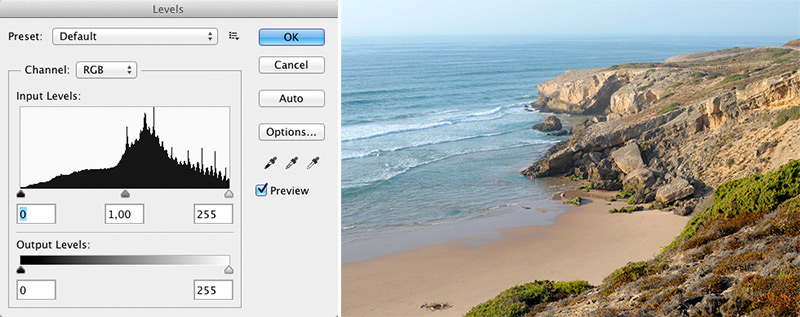
Step three: move the white point slider to where the histogram starts on the right, then move the black point slider to where the histogram starts on the left, then click OK.
By now you will have noticed an improvement in your image. Depending on how short your tonal range was to start with your reaction can vary from “wow, awesome!” to “yeah, looks a bit better”.
Of course, if your image is intentionally supposed to look dull and low contrast, like a misty landscape, then the technique mentioned above probably won’t work well.
Like everything, proper judgement of your scene is paramount since this technique has the potential to clip your highlights and your shadows. Some clipping might be OK depending on the image and/or your creative vision. A little hidden trick you can use to help keep tabs on those clipping demons is to hold down your ALT key while moving the white point or black point sliders, which will temporarily render your image black (when using white slider) or white (when using black slider). For example, by moving the white slider to the left while holding down the ALT key on the keyboard (image goes completely black) you’ll know clipping is occurring when colors start to join the party. This doesn’t necessarily mean the area in question is fully gone, it just lets you know that only a certain channel (R, G or B) has been clipped. Nevertheless when white starts to show you’ll know you’ve totally nuked your highlights, i.e reached its max value of 255. On the other end of the spectrum when fiddling with the black slider + ALT key, complete loss of detail in dark areas will be represented by black.
By the way, I don´t use the mid-tone slider all that much but little tweaks might be in order on certain images, by either lightening or darkening the mid-tones. Your mileage may vary.
Why I use Adjustment layers instead of Image Adjustments
The quick answer is: because Image Adjustments are permanent, Adjustment layers are not. By using Image Adjustments (using the adjustments under Image>Adjustments or any of it’s shortcuts) you permanently affect your pixels, which means that after you save and close your file or simply run out of History steps, you have reached the point of no return. So you just realized you were wearing sunglasses when you applied a Levels Image Adjustment to your image and want need to edit that adjustment? Sorry amigo, but that ship has sailed.
The beauty of adjustment layers is that they don’t affect the pixels of your image and allow you to work non-destructively. All they do is just sit on top of your image layer and contain information about how your image looks, they are totally editable and have a built-in mask too!
I love them and they’re all I use for my work and I highly suggest you do too.
The Levels tool has a few more bells and whistles that can help you address other issues in an image but in my opinion Photoshop has tools that do a better job of dealing with those problems.
Hope you guys enjoyed and found this article useful.
If you have any questions or care to share your experiences please leave them down below.
Thanks!

6 comments: On How to use Levels in Photoshop
I’m so glad I came across your website!
It was exactly what I was looking for and really helped answer my questions about how to use my levels in Photoshop! Not editing the pixels will really help me in the long run when I want to make changes. Thank you!
Hi Jessica,
You are welcome!
Adjusting your Levels is a quick and simple technique that anyone can use to improve their images.
Quite a lot of people, especially beginners (but not only), don’t even know that they have Adjustment layers available to them and only use Image Adjustments. Boy are they missing out! 🙂
Glad you liked the article!
Thanks for stopping by!
Great Article Nicholas, very powerful. It transmits a lot of knowledge and potential in a short text. Congrats. Keep them coming.
Hello Nick,
First of all, great article!
I’ve been using Photoshop for many years and the technique you mention here (bringing the black and white sliders in to where the histogram starts) has served me well for quite a while but I was totally oblivious to the fact that I could actually previse if any clipping was taking place, so the ALT key tip is gold!
Thank you!
Thanks Marco,
Happy you liked it!
Cheers!
Hi Luisa,
Indeed, Photoshop has many hidden gems!
Glad it helped!