
When it comes to image editing, Photoshop is a superpower. But, as they say, with great power comes great responsibility. Non-destructive editing in Photoshop is a concept you’ll need a solid grip on, in order to work efficiently. However, working in this fashion isn’t very intuitive and it’s definitely not how people naturally use the program. In fact, I know very few people who take advantage of this way of working, noobs and seasoned pros alike. But have no fear Photoshop warriors, once you get a hang of working like this, it will quickly become second nature.
Difference between destructive and non-destructive editing
Anytime we hear the word destructive or any of it’s derivatives, it’s in our human nature to think of something that has been completely FUBAR. But in Photoshop-language it doesn’t quite mean that. Over the years amazing work has been produced without using a non-destructive workflow and many will continue to work this way, well into the future.
As is described in my “What’s the difference between Photoshop and Lightroom” article Photoshop is a pixel based editing program. What this means is that without the proper knowledge, editing will be done at the pixel level i.e. you will be directly affecting pixels and any adjustments made will permanently be embedded into the file. So “destructive” in this context, really means “irreversible”.
A non-destructive workflow in Lightroom, for example, is native to the program, meaning there is simply no way you can butcher your originals. In Photoshop however, a non-destructive workflow is voluntary, therefor you have to edit in a certain way to keep your image safe. Of course you can keep copies of your images but that would only help to a certain extent since you will be starting all over again.
In this article I will be covering some techniques that will enable you to work non-destructively in Photoshop, which in a nutshell is to work in such a way that doesn’t directly affect pixels, gives you the flexibility of making future changes without compromising quality and keeps your original image layer intact.
Why work non-destructively and how to do it?
As many of us know, clients change their mind all the time, which is the same as saying that your first shot is most likely gonna be off-target. Having the ability to make changes to images according to your clients’ needs/desires/mood/whim quickly while maintaining quality, without having to start from scratch is a huge benefit. The same holds true if you are only a hobbyist. It’s all about flexibility, efficiency and staying in the driver’s seat, minus the frustration of having to go back to square one and start over. Having more free time to watch Game of Thrones, play with pooch or engage in extreme ironing competitions is always a plus too.
Now for the fun part. Photoshop has several methods available that allow you to work without affecting your pixels. I will show you the techniques I use with only a brief description of each but will go into more detail in separate articles.
Adjustment layers
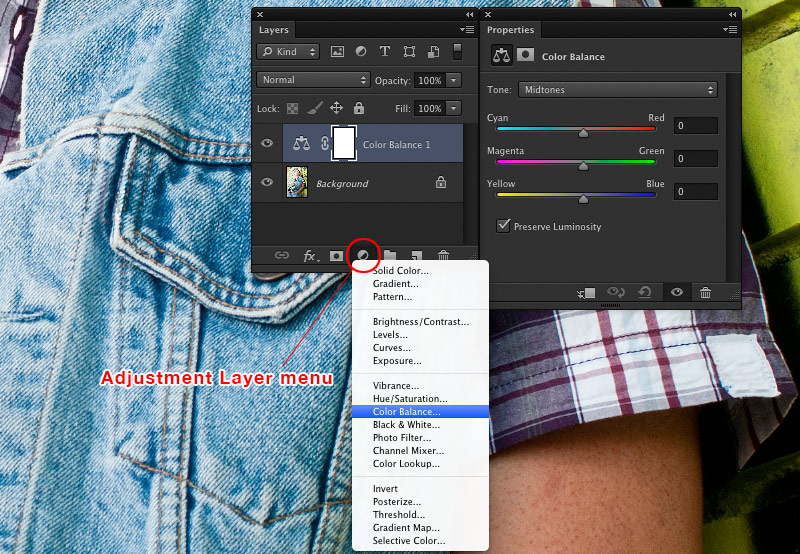
These are ready made layers that allow you to make tonal and color adjustments to your image and they can be summoned from the round black and white icon at the bottom of the Layers palette. These guys are awesome. When you add an Adjustment Layer it sits on top of the previously selected layer and affects all layers below it. Adjustment layers do not alter pixels, they just hold information about how the image looks. Not only do they have a built in mask allowing you to reveal or hide parts of the effect but you can go back at any future time to edit or reset previous settings. If you feel that a certain adjustment layer was a bad idea all together, just delete it.
The destructive equivalent to Adjustment Layers are the Image Adjustments and can be found… well, you already know where they are, don’t you? That’s it, top menu under Image > Adjustments > Pick your Poison.
Smart Objects and Smart Filters
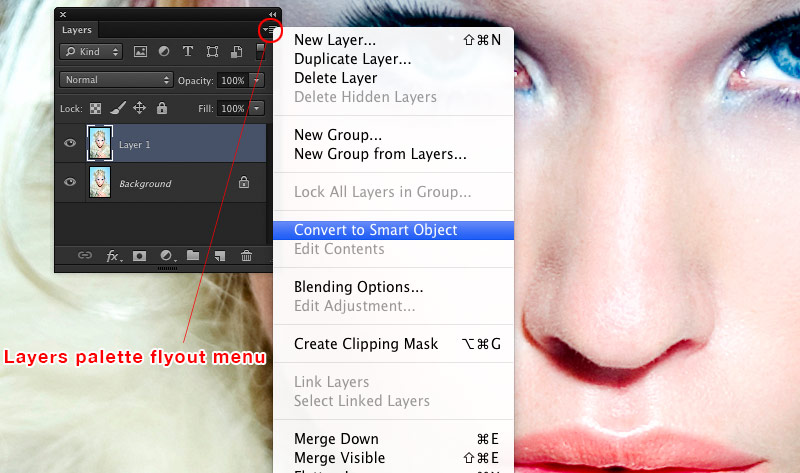
Smart Objects are layers that contain pixel or vector based image information and preserve the original content even after the layer has been edited. This means that the adjustments you make are made to a virtual copy of the layer not the original pixels. Smart objects shine brightest when you want to perform scaling, rotation, distorting etc because they keep the original size of the image protected.
If you apply a filter to a Smart Object, Photoshop turns it into a Smart Filter. With Smart Filters you can go back in and adjust it’s settings, hide it or simply remove the filter from the Smart Object. Also Smart filters have a mask included and you can even stack filters.
Retouching on a separate layer
Believe it or not, I actually know someone that, back in the day, performed minor retouching directly on a printed image with a really small paintbrush. This was of course prior to Photoshop but that was how retouchers rolled back then (so i was told). It’s needless to say that sometimes this technique didn’t work out so well and the print had to be trashed. The digital equivalent of this risky technique is to not use an empty layer (or copy of the original) for retouching.
By adding an empty layer on top of your image layer and doing your magic there, you are keeping your pixels out of harms way and if you screw up on this layer you can easily erase your mistakes or ditch the layer all together. Turning the retouch layer on and off allows for a before and after view too. Cool.
Masking
I’ve been using Photoshop for almost two decades now and although masks were introduced long before that, my initial adventures with the program resorted to actually erasing the pixels I didn’t want to be visible in the image. This worked OK sometimes, but more often than not, I just wished I hadn’t sent those pixels flying into the ether.
Then one day I was introduced to Masks and was instantly hooked.
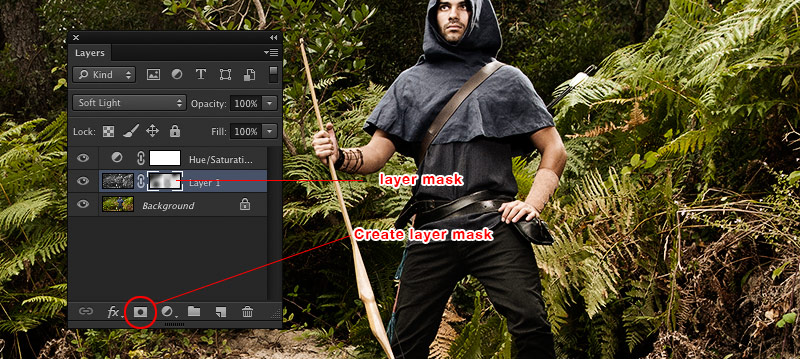
Masks allow you to Hide or Reveal (completely or partially) an effect or adjustment you have made to a layer or Group of layers. Erasing pixels will provide you with a similar result, but layer masks are much more flexible because they allow you to bring back or hide parts of the underlying image or effect, without ever deleting a single pixel.
Use a dedicated layer to Dodge and Burn
Dodging and Burning is a technique that dates back to the days of the darkroom, a process used to further lighten (Dodge) or darken (Burn) certain areas of a print. Like most activities in Photoshop there are several techniques you can use to Dodge and Burn but there is something common to every smart way of going about it and that is to not work on the image layer itself.
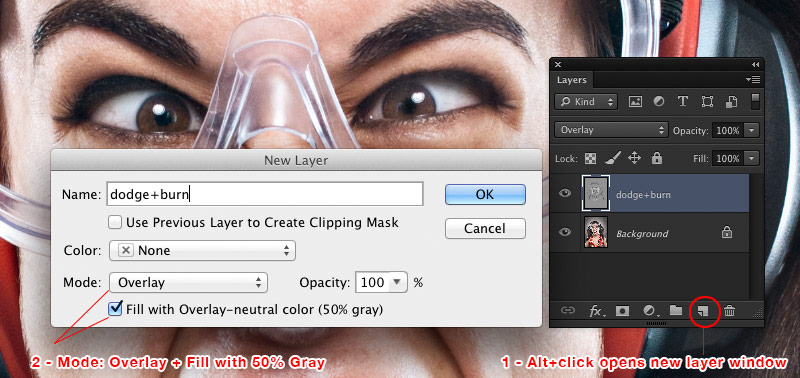
I do it like this: Add an empty layer > Change Blending mode to Overlay or Soft Light and Fill the layer with 50% Grey (super-great-awesome tip: Option (Alt) + click the new layer icon in Layers Palette allows you to do all this from the same window). Set your Foreground and Background to the default Black and White (another super-awesome-fantastic tip: press D on your keyboard). Black burns (darkens), White dodges (lightens). Select the Brush Tool and choose an adequate sized soft edge brush. Set Brush opacity to 5%-10% (I use 6%). Now you can D&B to your hearts content. Gone a bit too heavy on this technique? No problemo, just paint back over with 50% grey.
Wrappin’ up
So there you have it, developing a smart and efficient work ethic in Photoshop will improve your workflow tremendously, will definitely make you look like a Photoshop deity around coworkers, clients, fellow photographers and your boss, adds 30 seconds to your life for every adjustment layer you use (doesn’t count if you delete it) and can increase your chances of getting laid, if you’re also rich, funny and good looking. So, if you are not already using these techniques, these are a few damn good reasons to do so. 😉
Whether you’re a photographer, designer or digital artist, when daily work life throws you a curve ball, it’s very likely that non-destructive editing will save your butt.
I would love to hear from you guys so if you have any questions or would like to share your experience please do so in the comment section below.

2 comments: On How to do Non-Destructive Editing in Photoshop
Very enlightening Nick, looking forward to your more detailed articles about each of these non-destructive editing methods!
Hi Nancy,
Glad you liked it, stay tuned for more articles!