I come across the question “how to learn about photography?” quite often and more times than not, the answer boils down to explaining what aperture, shutter speed and ISO are, the relationship between them and how they consequently determine exposure. While this approach is not wrong, I believe, since light is the raw material of photography, that learning about the basic characteristics of light and how it behaves first, would place the when-I-grow-up-I-wanna-be-a-photographer crowd in a good position not only for merely improving their pictures but for becoming a better photographer too.
Now, before I move on, let me say that simply being knowledgeable about light doesn’t make you Greg Heisler overnight. Like baking a cake, just having all the ingredients won´t guarantee a mouth watering finished product, unless you know the right amounts of each, the order in which they are added, what tools to use, baking times etc. Light is just one of the ingredients of photography, albeit an indispensable one and being able to describe it will set you up nicely for being able to control it.
So without further delay, here are the main characteristics of light:
Brightness
For amateur and pro photographers alike, brightness has to rank #1 for the most important quality of light. In the absence of brightness (a.k.a darkness) it is impossible for a picture to come into existence. What if there is too much light?, you may ask. Have no fear, aperture is here! (well, so is shutter speed and ISO). When there is an abundance of light the photographer has means of controlling it’s quantity through aperture, shutter speed and ISO settings on the camera (which I won’t go into here).
Color
Lights can be almost any color or any combination of them and can truly turn a scene into a feast for the eyes. Having said that, the vast majority of images are made with white light… but all white light is not made equal.
When we have an equal (or approximate) mix of the three primary colors Red, Green and Blue or RGB, for example R=256, G=256 and B=256, the light produced is perceived as white. Unequal mixes of these RGB values will produce other colors. Depending on how unequal these values are, resulting colors can range from very distinct hues, like orange or purple, to variations of so called white light. To label color differences in white light, the means to measure it is called the color temperature scale that has Degrees Kelvin as it’s measurement unit.
As a reference, 5500°K is called daylight. This means that a light source at this temperature is supposed to produce white without any shifts towards cooler colors (blue, ex: 8000°K) or warmer colors like reds and yellows (ex: 3200°K). In other words daylight is considered as being the purist of whites which, most of the time, is desirable. Digital cameras allow us to control variations in white light via White Balance settings that automatically corrects the color temperature in a scene to mimic that of daylight.
Contrast
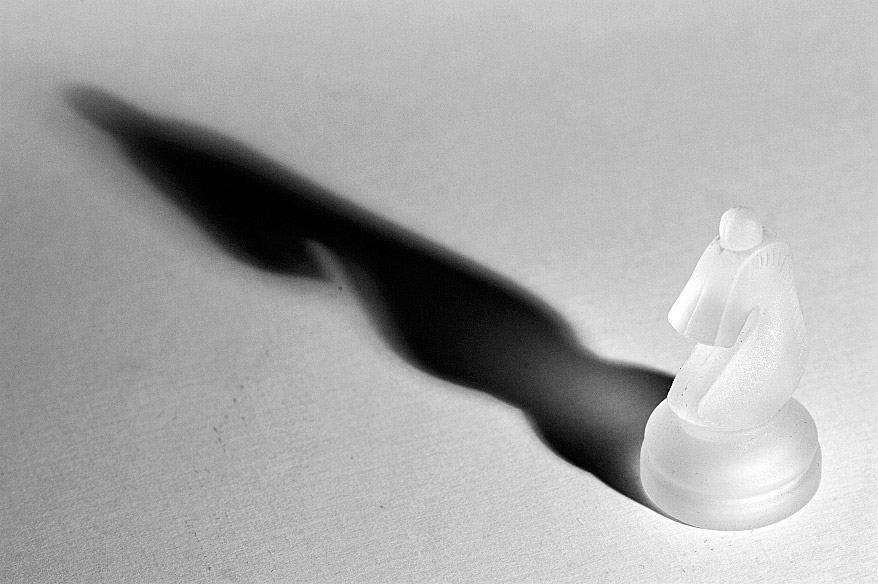
The third characteristic of light, in a photographic context, is contrast. A light is said to have high contrast when the range of tones between pure black and pure white is small. This is achieved when the rays from a light source reach the subject at roughly the same angle, resulting in abrupt transitions from highlight to shadow. An additional clue indicating you are in the presence of a high contrast scene is the shadow cast by the subject. It’s edge will be hard and defined. High contrast light sources are also known as hard lights. As an example, take a look at the sketch below (please forgive my pre-schooler drawing skills).


As opposed to bad-ass high contrast light, which is very in your face and directional (reaching the subject from the same angle, remember?!) low contrast light on the other hand is soft, meaning that the light striking your subject is coming in from multiple directions. A classic example of low-contrast light is an overcast day. What’s happening? Well, the sunlight before reaching Earth is scattered when it hits the clouds exiting them in all directions, turning a very directional light (before it reaches the clouds) into a very multi-directional or soft light source (when exiting the clouds). Since the subject is getting hit from several directions the resulting shadows will be soft edged because they are being partially lit by this scattered source. Light sources that create soft and undefined shadows are also called soft lights.

Size matters
When it comes to contrast, the size of the light source is it’s primary determining factor. Quick quiz: is the sun on a cloudless day a big or a small light source?
If you said big, I’m sorry, but you’re wrong. Although the Sun is many times larger than planet Earth it is sooooo far away that it’s effective size is actually very small, making it a small light source, thus a hard one. In photography, the physical size of a light source doesn’t always equate to it’s effective size!
How about a 24″x24″ light source, 2 feet away from a 5″ subject?
That’s right! It’s a big light source! Note that not only does distance help determine the effective size but so does the relationship between the effective size of the light source and the size of the subject.

To understand effective size, here is an example: a small light source (like a hot-shoe flash) fired directly at a human subject has an effective size of roughly 2,5″x1″. A really small source in relation to it’s subject, therefor a hard light. But by turning the flash around and firing it into a 8’x10′ white wall, the effective size of the source is now huge (because it is bouncing off of a large surface), making it a soft light.
Photographers have many accessories (a.k.a modifiers) at their disposal to help them control how their lights behave.
Subject matters
Up until now we have talked about the main characteristics of light. We have touched on the subject of lighting but mostly on how it affects the shadows, helping us identify hard and soft light sources. Highlight is the area of the image that is being lit.
Lighting is more than just light though. The exact same light source striking two physically different surfaces can produce significantly different highlights. In other words, the subject is one of the determining factors in how the highlight will look. The relationship between the light, the subject and the viewer is at the heart of Lighting.
The photographic subject can transmit, absorb or reflect photons (light particles).
Transmission
Light that is transmitted passes through the subject. An example of a material that transmits light is clear glass. When light strikes a transparent object like glass at an angle perpendicular to it’s surface it will travel in a straight line.
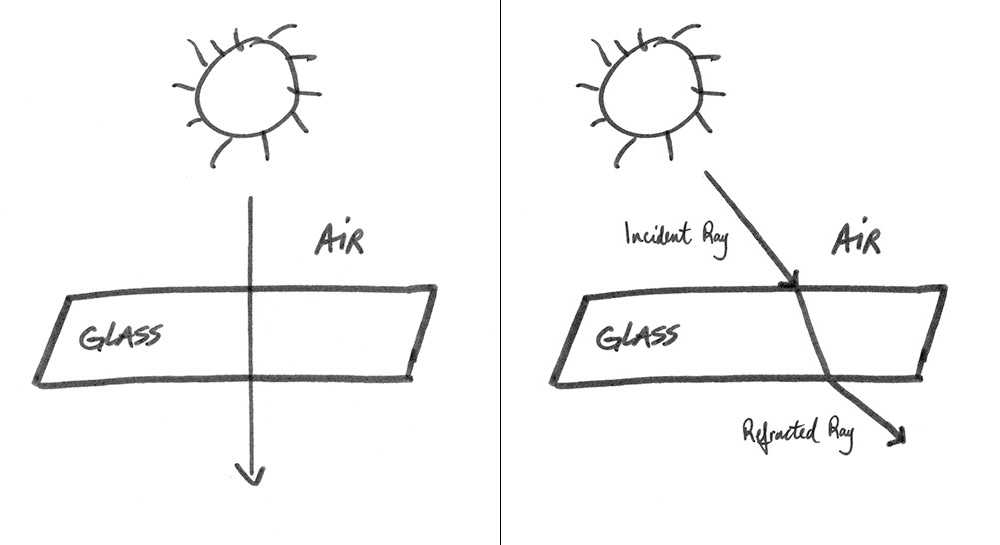
Right: When light rays strike light-transmitting materials at any angle other than perpendicular, it bends. This bending is called refraction.
When striking at any other angle a phenomena called refraction occurs, which is the bending of the light rays, due to having their speed reduced when entering a denser material. This is why items seen through certain transparent objects may appear distorted.
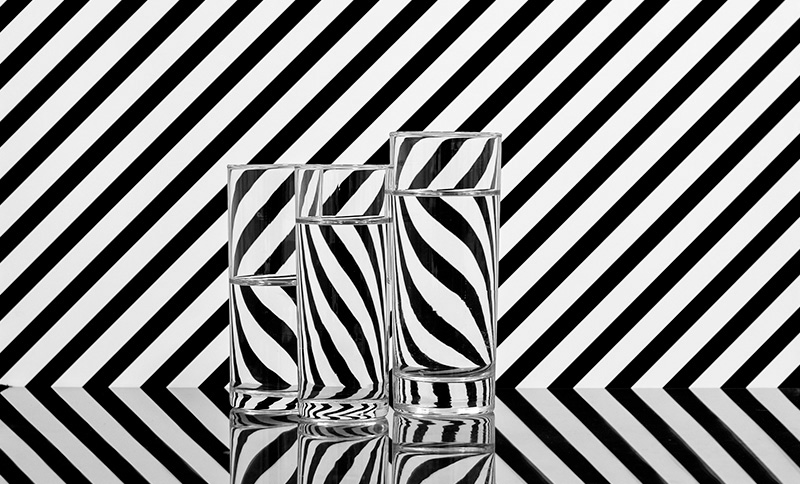
As opposed to direct transmission, that we just talked about, diffuse transmission happens when the light passing through materials such as white glass, white acrylic or a thin white cotton sheet, scatter light rays in multiple directions (like the clouds mentioned earlier in this post). These materials are also called translucent and are characterized by diffusing light (softening) while transparent materials do not. Putting a translucent material between your light source and your subject will increase it’s size and consequently soften it. As opposed to transparent materials that only transmit (and can reflect) light, translucent materials transmit, absorb and reflect light in varying quantities.
Absorption
When light is absorbed by the subject it becomes invisible. It still exists as energy but is usually released (by the subject) as heat (invisible). Ever worn black clothing out in the sun? Talk about an outdoor sauna! That’s because that black Iron Maiden Tee you were wearing was suckin’ up all those juicy photons!
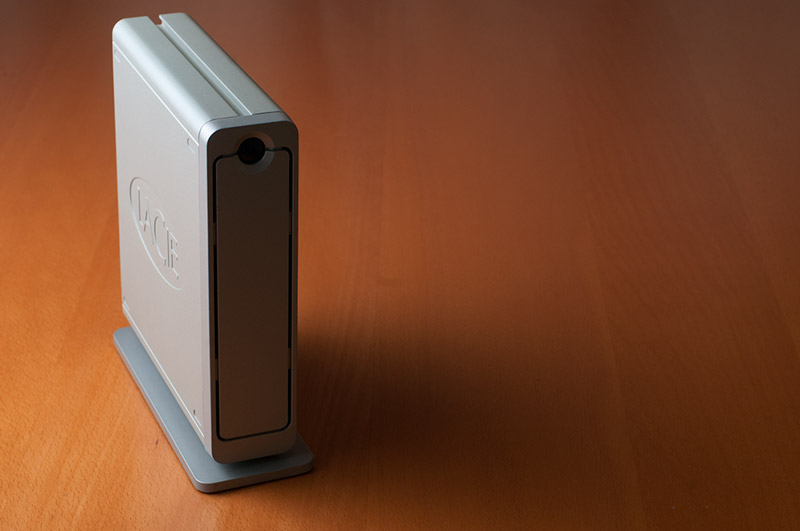
Dark subjects like black velvet are the most difficult subjects to photograph because they absorb light like a sponge. Most subjects absorb only part of the light reaching them and is, for this reason, why we perceive objects as black, white or some in-between gray. Different subjects will absorb certain light frequencies more than others, which in turn determines their color.
Reflection
Light reaching a subject and bouncing off it is called reflection. This phenomena is what makes vision possible. A world without reflection would mean a world without light. We do not see objects per se, we see light that is bouncing off them, thus revealing their shape, their texture, their beauty.
Well, these are just the basic characteristics of light and some theory on it’s behaviors which, in my opinion, should be one of the first things to understand when learning about photography. I do encourage you to grab your camera, go out and experiment, keeping in mind these basic principals.
I’d love to hear your questions, opinions and/or experiences so please leave them down below.
Thanks!
Stay tuned!


18 comments: On How to learn about photography? Start with light.
Good lighting is the basis of a great photo! I love the tips you’ve given here.
I’m hoping to get my first camera soon so will be returning to this page for some ideas. I’m going to be making videos more than photos but I can imagine this still applies to video making.
Keep up the good work on your site.
Hannah.
Hi Hannah,
Absolutely true! And thanks!
With video you will be working with continuous light sources (a.k.a hot lights), but yes, the basic principles of light are the same for photography and video.
I’m just getting my feet wet with video, so it could be a while before I post anything related directly to this medium.
I have always thought that in another life I could have been a photographer. I love taking pictures and knew some of the things with light that you mentioned here. However I did not know quite all of it so I will be bookmarking your site here to help me turn this thought into a hobby for myself.
Hi James,
I think that in a way, we are all photographers in our day and age, be it with a point and shoot camera, DSLR or mobile phone, with or without a solid understanding of what photography is all about.
Photography can be a very satisfying hobby to have and I wish you all the best!
Hi Nick,
What a wonderful article! Pretty long I have to say, but very interesting. It looks like you are very knowledgeable on this subject.
I learned quite a bit about contrast, brightness and color, that I hadn’t really ever thought of. Although I am not much of a photography person, I do like what you wrote here.
Hi Alexey,
Thanks, glad you enjoyed it!
It is amazing how many details are hidden in such a simple phenomenon as light. But more inspiring are those who discover how to reproduce it on an artificial support and create a second world in a photo.
Ernst,
Agree completely! Artificial lighting is one of my passions because of what it allows me to create. Use it the right way and anything is possible (photographically speaking, of course).
That’s why I love to Light! 🙂
In school it was important for us to learn how to take a good photograph. I learned enough to get me by but I really wish I delved into it more. I think it would’ve made a big difference in my overall work. You really know your stuff. Good sketches! They do a great job of conveying the message.
Hey Damascus,
I never thought I would be getting compliments on my drawing skills! 🙂
Glad they helped in understanding the accompanying photos.
Thanks!
Some very good information here. Light is what makes a photo good/bad in my opinion. Just by looking at professional photos vs. normal everyday photos you can see a clear difference.
Darrik, you are absolutely right, those who have a solid foundation of how light works have the advantage over those who don´t.
Thanks!
Nick, this is great information. I took an introductory DSLR photography course about two years ago and very much enjoy getting out and experimenting.
We learned about the triangle (aperture, speed, ISO) but not about small and large light sources. This was a revelation for me – makes complete sense from a scientific perspective – and fills in another piece of the puzzle. This gives me the basics for those occasions, particularly indoors, when I’ve got to go to some sort of lighting set-up. I’ll know now how to get what I want to achieve.
Thanks for putting this together.
You are very welcome Larry! Yes unfortunately many of the beginner courses seem to leave the subject of light and it’s behaviors for more advanced classes, when I think that students would benefit greatly from having it introduced to them early on.
Thanks for sharing your experience!
Great article man. I just ordered a cheap camera (Nikon CoolPix L820) I don’t know if you know much about it but I love to know your thoughts about it.
Hey Brandon,
To be honest I’m not well versed in compact/bridge cameras but I have a photographer friend who has had one for a couple of years and likes it a lot! Obviously he doesn’t use it for work but that’s all he takes when on holiday due to it’s light weight and small size. Since it’s a 16MP camera he makes some awesome large prints from this little puppy.
All in all, there are many different cameras on the market and depending on your needs, some will serve your purpose better than others. For the price, I would say you have a nice little camera!
This is a lot of great info! I like your photos and illustrations you used for this article. They make everything really clear for us visual learners.
When I get a new camera, I really want to get back into photography. Lately I’ve been mostly doing simple nature shots with my iPhone. I know it’s not “legit” photography but it’s still fun and I’ve had some pretty lens flare and bokeh effects.
I also really like your writing style. It’s entertaining and still gets the point across. Keep it up!
Hey Karyn,
Happy you enjoyed the article!
Taking pictures with your phone is legit photography, in my opinion. There is actually a growing trend called iPhonography, so don’t feel bad about not shooting with a DSLR. There are quite a few folks earning some real cash by selling their iPhone snaps.
Thanks for stopping by!